Prerequisites
Please read App Developers / Introduction first.
Before you begin, please install a text editor such as VSCode and git client on your laptop. You will also need to install jq and nibabel, which will be explained later.
HelloWorld
Here, we will create a "HelloWorld" Brainlife App.
We will show how to create a brand new github repository containing a Brainlife App. Please be sure to make the repo public so that the brainlife.io platform will be able to access it. You can name the repository as you prefer, the Brainlife Team has been naming apps starting with the prefix app-, for example, take a look at these Apps.
As a start we will create a HelloWorld App, i.e., app-helloworld, here is an example. Git clone your new repository on your local machine - where you will be developing/editing and testing your App.
1 | |
1 | |
Now, cd inside the local directory of the repository and create a file called main. This file contains some information about the UNIX environment (bash-related collands), the procedure to submit jobs in a cluster environment (PBS-related commands), parsing inputs from the config.json file using jq (see here for more information about jq). For example:
1 | |
main
After creating the file main inside your local folder for the github repository app-helloworld, we will edit the content of the file and make it executable. Use your preferred editor and edit the file. Copy the text below inside the edited main file, and save it back to disk.
1 2 3 4 5 6 7 8 | |
Please be sure to set the file main is executable. You can do that by running the following command in a terminal, before pushing to the github repository.
1 | |
Finally, add the file to the git repository and commit to github.com by running the following:
git add main
git commit -am "Added main file"
git push
Note
jq is a command-line tool used to parse a small JSON file and pull values out of it. You can install it on your machine by running something like apt-get install jq or yum install jq or brew install jq depending on your Operative System (OS) or OS distribution. Also note that thee Brainlife computational resources (Cloud) where that App will need to run, will need to have common binaries installed including bash, jq, and singularity.
For Mac Users
You will need to have the XCODE, Apple Development Tools and homebrew to install jq. Once Xcode is installed run this command /usr/bin/ruby -e "$(curl -fsSL https://raw.githubusercontent.com/Homebrew/install/master/install)" and then this command brew install jq in a terminal.
The first few lines in our main instruct PBS or Slurm batch systems to request a certain number of nodes/processes to our App.
1 2 | |
The following lines parse the config.json (explained below) using jq and the value of t1 to the main part of the application which we will create later.
1 2 3 | |
To be able to test your application, let's create a test config.json.
config.json
1 2 3 | |
On brainlife.io, all input parameters (configurations and paths to input data) are communicated to your App through config.json. This file is created by brainlife.io on the root directory of your App (where the main script is) when a user submits your App. To develop and test your App, you will need to create this file manually and design your code to read any configuration parameters or paths to your input data from this file.
There are several ways to load / parse config.json. For bash script, you can install and use a command called jq as we have shown above.
For python, you can use json.load() method.
1 2 3 4 | |
On Matlab, you can use jsondecode.
1 2 | |
For our example, please update the path for t1 to wherever you have your test anatomy input file. If you don't have any, you can download one from the Open Diffusion Data Derivatives publication page. Just click the Datasets tab, and select any anat/t1w data to download. Then create a directory in your home directory and move the t1w.nii.gz file in there and unpack it:
cd ~
mkdir data
cp -v /path/to/your/downloaded/5a050966eec2b300611abff2.tar ~/data/
tar -xvf ~/data/5a050966eec2b300611abff2.tar
At this point, ~/data/ should contain a file named t1w.nii.gz. Next, you should add config.json to .gitignore as config.json is created at runtime by Brainlife, and we just need this now to test your app.
Hint
A good pattern might be to create a file called config.json.sample used to test your App, and create a symlink ln -s config.json config.json.sample so that you can run your app using config.json.sample without including the actual config.json as part of your repo. This allows other users to construct their own config.json if they want to run your app via command-line.
What files can I expect to find in config.json?
The above example assume that we are feeding neuro/t1w datatype. But what about other datatypes?
As a developer of an App, later you will register a list of configuration parameters and input data types to feed to your App. Please look through the list of datatypes currently registered on brainlife, and for each datatype you can see a list of files / directories available for each datatype.
For example, neuro/meg/ctf datatypes has a meg.ds directory and a few other optional files.
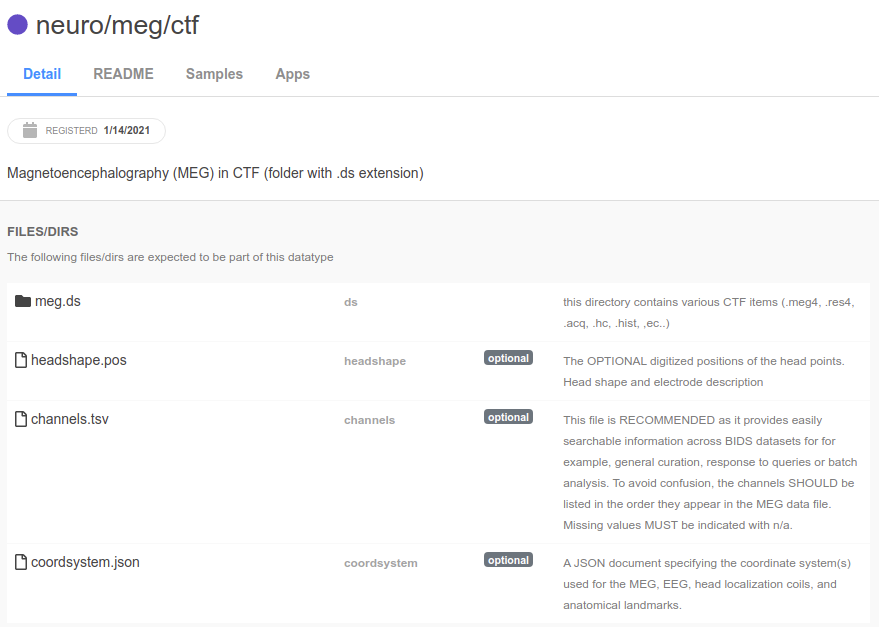
When you registere your App, you not only specify which datatype to use, but you will also decide what to call each of those files/directories in your config.json.
The registration for your App might look like this..
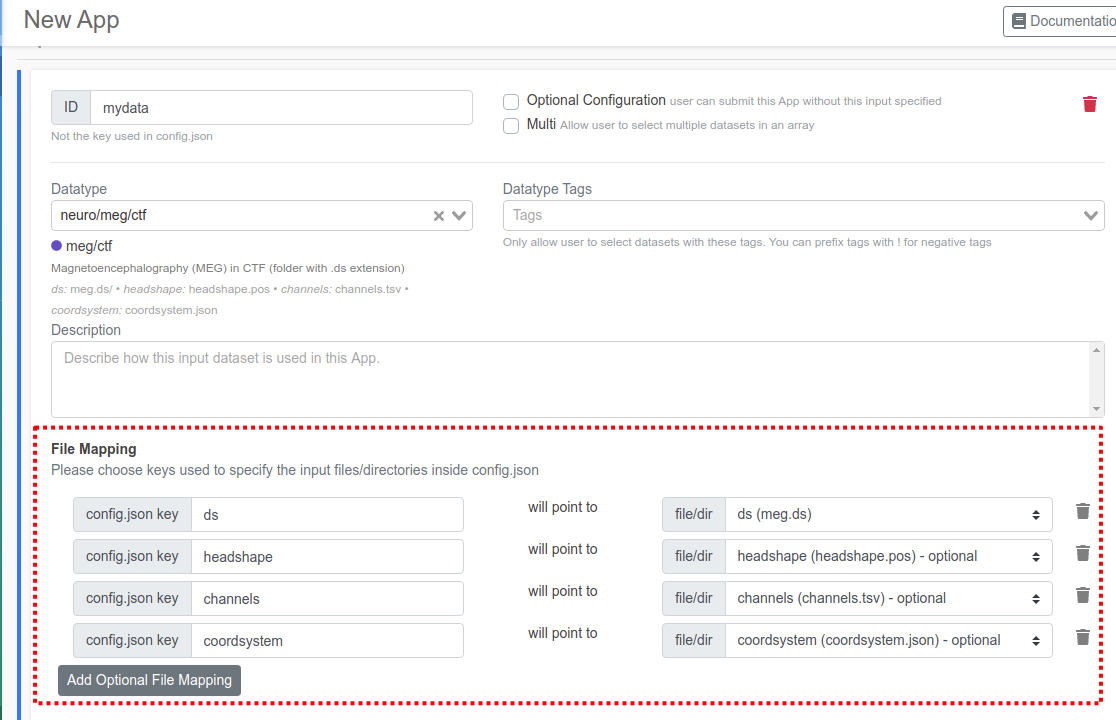
The File Mapping section determines which files/dirs will be mapped to which key within your json file. When a user submit your App, brainlife.io will create config.json that looks like the following.
1 2 3 4 5 6 | |
As you can tell from the datatype registration, the only required files in this datatype is the meg.ds directory, so other files maybe missing and your App will need to check if they actually exists (the filepath might be invalid or points to a missing file).
If you have 2 input data objects with the same datatype, you might want to name the keys for either input differently so that your App can distinguish them (say "ds1" and "ds2", for example)
app.py
Our main script runs a python script called app.py so let's create it and edit it by copying the content reported below.
cd ~/git/app-helloworld
touch app.py
1 2 3 4 5 6 7 8 9 10 | |
Again, be sure to make app.py also executable.
1 | |
Finally, add the file to the git repository and commit to github.com by running thee following:
git add app.py
git commit -am "Added app.py file"
git push
Any output files from your app should be written to the current working directory and in a file structure that complies with whichever the datatype of your dataset is. For now, we are not going to worry about the output datatype (assuming we will use raw)
Please be sure to add any output files from your app to .gitignore so that it won't be part of your git repo.
.gitignore
1 2 | |
Note
.gitignore is a text file that instructs git to not track certain files inside your work directory. Please see ignoring files
Testing
Now, you should be able to test run your app locally by executing main (nibabel should be installed first, e.g. by executing pip install nibabel)
1 | |
Now, it should generate an output file called output.txt containing the dump of all nifti headers.
1 2 3 4 5 6 7 8 9 10 11 12 13 14 15 16 17 18 19 20 | |
Pushing to Github
If everything looks good, push our files to Github.
1 2 3 | |
Congratulations! We have just created our first Brainlife App. To summarize, we've done the following.
- Created a new public Github repo.
- Created
mainwhich parsesconfig.jsonand runs our App. - Created a test
config.json. - Created
app.pywhich runs our algorithm and generate output files. - Tested the App, and pushed all files to Github.
Info
You can see more concrete examples of Brainlife apps at Brainlife hosted apps.
To run your App on Brainlife, you will need to do the following.
-
Enable your App on at least one Brainlife compute resource.
For now, please email brlife@iu.edu to enable your App on our shared test resource.