product.json
Your App can optionally generate a file named product.json to send information back to Brainlife. You can think of it as the counterpart for config.json. As config.json is used to pass configuration parameters from the user to an App, product.json can be used to send information from your App back to Brainlife upon successful completion. The information stored in product.json can be used relay information back to the App submitter, or used to perform data aggregation quickly across multiple subjects.
Warning
You should not store more than a few kilobytes of information on product.json.
You can use product.json for the following purposes.
- Display messages, statuses, graphs(plotly) on Brainlife UI.
- Store a small amount of unstructured data that you can later use to quickly aggregate across multiple output datasets.
- Specify user tags (or datatype_tags) to be added to the output dataset.
We will explain each use case below.
1. Displaying messages, graphs on Brainlife UI
Although product.json can store any data, we've defined a special key("brainlife") that you could use to render graphical information back to Brainlife UI.
Messages (error / warnings)
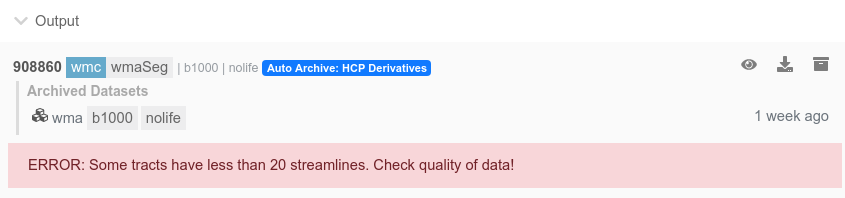
You can display error / warning messages on Brainlife process UI by storing them in the following format.
1 2 3 4 5 | |
The above message will be displayed under the Output section of the process UI as well as in the dataset detail page, like the following.
You can also display the following message types.
1 2 3 4 5 6 7 8 9 | |
Graphs (plotly)
You can also display plotly graph.
1 2 3 4 5 6 7 8 9 10 11 12 13 14 15 16 17 | |
You can embed images by first base64 encoding the image and storing it on product.json
1 2 3 4 5 6 7 8 9 | |
2. Storing unstructured data
Any unstructured data can be just stored anywhere inside the product.json.
Like...
1 2 3 4 | |
You might have Apps that could produce multi-gigabytes of output datasets. If you need to run aggregation process across many subjects using such outputs, you might end up needing to stage hundreds of gigabytes of output datasets which may or may not be possible, or desirable to do so. Instead, you could produce pre-aggregated data and store it inside product.json. You can then query all datasets and download product.json contents from each dataset without having to download the actual output datasets. Please take a look at Brainlife CLI for more information on querying datasets.
3. Specifying dataset (user) tags
Your App can set "tags" key to specify dataset tags that you'd like to add to the dataset output.
1 2 3 | |
Note
If you have multiple output datasets, specified tags will be applied to all output datasets. If you'd like to specify different tags for each output dataset, please read the section below ("Multiple output datasets")
You can also set(/override) dataset metadata
1 2 3 4 5 6 | |
Although not recommended, you can also override the datatype tag of the output dataset.
1 2 3 | |
Warning
Brainlife UI relies on each App to have predetermined datatype and datatype tags. Overriding datatype tags could cause your workflow to be inconsistent. You should also make sure that any datatype tags you are using is valid and registered for your output datatype.
Multiple output datasets
Most Apps output more than 1 datasets. By default, all information stored on product.json will be copied to all output datasets. If you'd like to store different information for each output dataset, you can do so by organizing your product.json with App's registered output IDs as keys on the root of product.json
For example, let's assume you have an App with 2 output datasets; t1, and mask, and you have used "t1" and "mask" as output IDs when you registered your App.
You could then output something like the following product.json
1 2 3 4 5 6 7 8 9 10 | |
When this product.json is imported, brainlife will pick "t1" as the root of product.json for t1 output, and "mask" as mask output. You can still store items on the root of the product.json which will be merged on to output specific data. This is useful if you have information that is common across all outputs, but wants to be able to specify output specific information also.